Using Home Assist to sleep/resume a Linux PC
Posted on 2022/12/16 in Linux
Intro
All right, you automated lots of stuff arround your place with Home Assistant, but what about your PC ?
Wouldn't it be cool if you could turn it on or off from anywhere, just tapping on a button in your phone screen ?
Well, if your PC supports Sleep/Resume, you can do it with a couple of scripts. I'll demonstate here how to do it for a Linux desktop/notebook. You can addapt this to MacOS, maybe even Windows. You you do it, let me know on Mastodon, just Toot me at @nerdeiro@fosstodon.org.
Checking system
First of all, let's check if your system supports Sleep/Resume. On a laptop, this is pretty much a given, but on a desktop, it may not be enable on the BIOS settings. Run the command bellow to check it:
$ cat /sys/power/state

freeze mem disk
If you get this response, your system supports S3 sleep. Good. If not, check your BIOS settings. Since each mother board maker have different menus, I can't help you that, sorry.
Second, to wake up the system, it'll be necessary to enable Wake on Lan (WoL) too. This is another BIOS setting the you need to check, keep in mind that some board makers (Like Asus), might not have an explicit "Wol" or "Wake on Lan" setting, in Asus boards you need to activate a setting that says "Power On By PCI-E".
Now, to make WoL work, you're have to find what is your actual MAC Address. It is possible to use a custom MAC when the system is up and running, but the system is on S3 (Sleep) state, it's the BIOS that will answer to the "Magic Packets", using the factory assigned MAC. Fortunatelly, using the ip command in Linux, we can figure this easily:
$ ip link show

2: eth0: <BROADCAST,MULTICAST,UP,LOWER_UP> mtu 1420 qdisc mq state UP mode DEFAULT group default qlen 1000
    link/ether xx:yy:de:ad:be:ef brd ff:ff:ff:ff:ff:ff permaddr xx:yy:zz:aa:bb:cc
The address after 'permaddr' is your factory assigned MAC. Write it for later.
Remote scripts
Now, let's prepare the scripts that will do the magic. SSH to your Home Assistant box, if HA is running on a container instead of a as stand-alone OS, make sure you're comfortable with Docker's or Podman's commands, because you're gonna need to do some restarts.
Now, let's see what our scripts look like, before deploying them to HA.
The suspend script
This is the script that should put the machine to sleep:
#!/bin/bash -

ssh -t -o StrictHostKeyChecking=no -o UserKnownHostsFile=/dev/null \
    -i /config/keypair nerdeiro@192.168.1.2 \
       'logger "Sent to sleep by Home Assistant"
        sudo systemctl start suspend.target'
A little bit of explanation about the script. Since it's supposed to run a command using sudo (see bellow why), we need to run SSH with -t option, so it creates a pseudo-TTY on the other side, or it will fail, then since we don't want to deal with SSH known hosts stuff, We tell it to ignore strict host checking and use /dev/null instead of $HOME/.ssh/known_hosts.
After that, we have the private key used to authenticate in the target box, the user and host and the script itself. This is where you should be asking "Hey, but what if the IP address changes ?". Well, make sure it doesn't. Either configure a static IP on your machine, or set up your DHCP server/WiFi router/whatever to always assign the same IP to you, based on the MAC Address. In my case, the DHCP server that distributes addresses on my LAN is a Pi-hole, which you should be using anyway to block ads and trackers.
Then the script that will run on the other side. In this example, it's a two-liner because I added a line to generate a syslog message with logger. If you just want the suspend command, there's no need to put it between single quotes. For multi-line scripts, that's necessary.
Now, you might be wondering, why use sudo with systemctl to start the suspend target ? I don't need it locally ! The answer for that is polkit, which has a local agent that authenticates you and lets you suspend the machine without explicitly using pkexec or sudo, but since polkit agents don't work over SSH (maybe they do, but my DuckDuckGo skills failed me this time), we'll have to use good old sudo instead.
Now, let's deal with authentication on the machine we want to suspend. Putting your password on a script is a bad idea and it's cumbersome to use, so a key-pair is the way to go. So, SSH to the machine running Home Assistant and create a new pair of keys there. If you're running HA on a container, you should have a directory somewhere that is mounted as a volume under /config inside the container. You can even do this from inside the container itself. Run docker ps, get the name of the container (let's say it's called "homeassistant") and run docker exec -ti homeassistant bash. This should put you right at the /config directory inside the container. If your HA is a stand-alone OS, once logged into it, change to the root user with sudo su - and cd /config. Creating a key-pair is as simple as running ssh-keygen -t ed25519 -f /config/keypair and pressing Return a couple of time to leave the password empty. If you prefer RSA keys, intead of ED25519, just remove the -t ed25519.
Once you have the key-pair, copy the contents of the file ending in .pub to the target machine and add it as a line in $HOME/.ssh/authorized_keys. Try SSHing to your PC from inside HA-OS or container using this key, just to confirm everything is OK before proceeding.
The resume script
This is the one that wakes uo your machine:
#!/bin/bash -

wakeonlan -i 192.168.1.255 xx:yy:zz:aa:bb:cc
This is a very simple one. We don't even need to worry about installing the wakeonlan command, as it's already provided on the Home Assistant container/OS. The only thing you should change here is the network broadcast address and the MAC Address your your PC. To find what the broadcast address is, run the command:
$ ip address show

2: eth0: <BROADCAST,MULTICAST,UP,LOWER_UP> mtu 1420 qdisc mq state UP group default qlen 1000
    link/ether xx:xx:de:ad:be:ef brd ff:ff:ff:ff:ff:ff
    inet 192.168.1.2/24 brd 192.168.1.255 scope global enp4s0
       valid_lft forever preferred_lft forever
The broadcast address is the one right after brd on the 3rd line.
You can test if its working, as long as you have some other device that can SSH to Home Assistant. Put your PC to sleep, then from HA, run the wakeonlan command like in the script. If the PC turns on, we're set. If not, make sure that the machine supports this feature, same for the network card, if it's an add-on, and your BIOS is properly configured.
Home Assistant setup
All right, lets get to the good part. Setting up Home Assistant itself.
Before we start pushing the mouse on the GUI, there are a few configurations we need to do, to tell Home Assistant the scripts exist. Locate whre the file configuration.yaml is. If you're docker execing into the container or SSHd to the HA-OS, it'll be located in /config, if you're outside the container, check in docker which directory is used as the /config volume.
Create both scripts on the /config directory, making sure they're executable, run chmod 755 script if neccessary. Run each of them from the CLI, just to be sure they work.
Now, open up configuration.yaml on your favorite editor, such as Vim or Nano, and add this lines:
shell_command:
  sleep_script: /config/sleep.sh
  wake_script: /config/wake.sh
Listing them as shell commands in configuration.yaml will create the services that can be run, but to add them as buttons on a dashboard we need to create them as script entities. If you look at the configuration, you should see a line like:
script: !include scripts.yaml
So, save the configuration file and open scripts.yaml on your editor. Don't worry if it's empty, just add the following lines to it:
pc_sleep:
  alias: pc_sleep
  sequence:
  - service: shell_command.sleep_script
    data: {}
  mode: single
pc_wake:
  alias: pc_wake
  sequence:
  - service: shell_command.wake_script
    data: {}
  mode: single
Those will tell Home Assistant that they exist, so we can set them up on the GUI, which is the next step. So, save the files and restart Home Assistant, either by rebooting the server if it's an OS install or by restarting the container. After that, log on to the GUI and lets create some buttons.
Creating buttons
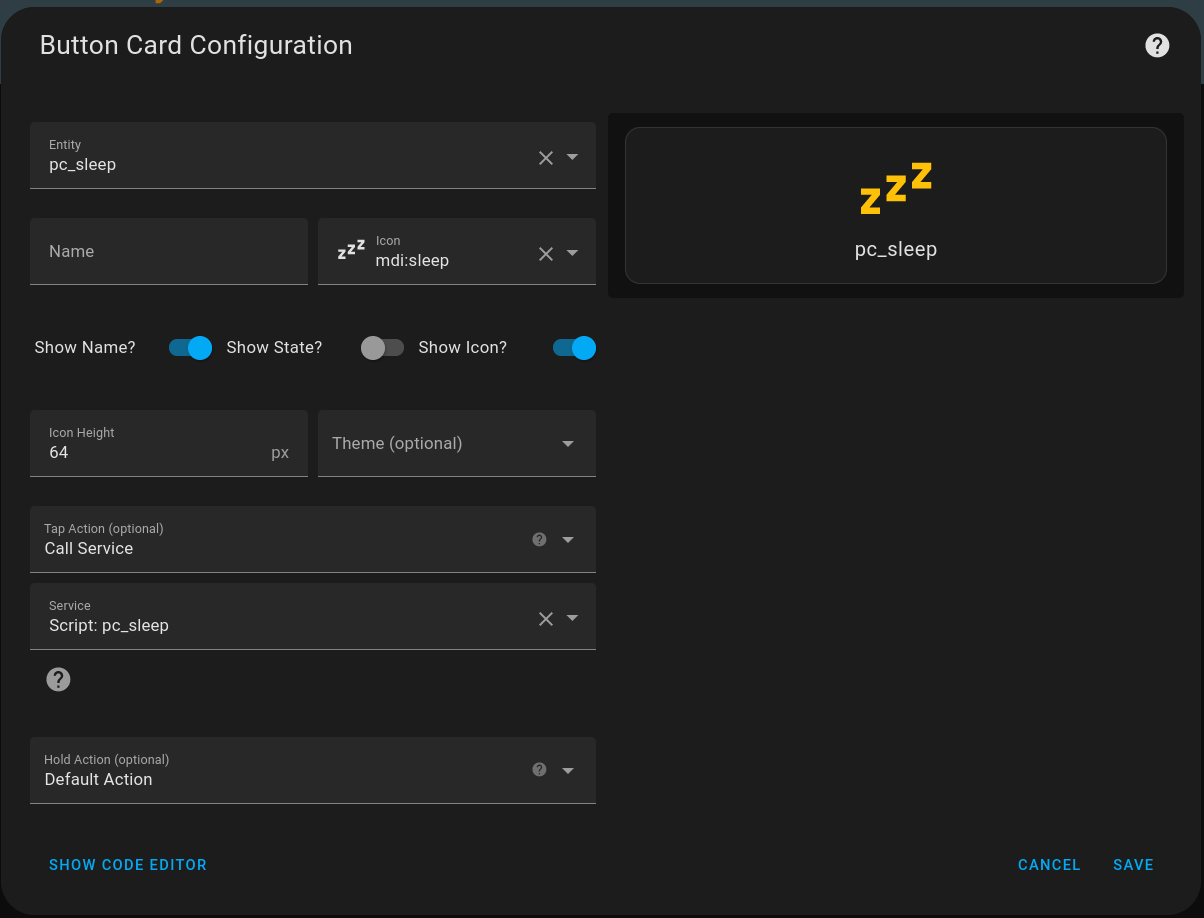
On the Home Assistant GUI, chose the dashboard where you want the suspend and resume buttons to be and click on the "hamburger" menu, it should be on the top-right of the page, and chose Edit Dashboard. Then click Add Card and chose "Button". Fill in the following:
- Entity: Select one of the scripts we created (e.g. script.pc_sleep)
- Name, Icon, etc.: It's up to you how it would look like.
- Tap Action: Select Call Service
- Service: Again, select the script you want to run.
It should look like this:
Testing the setup
I made a small video showing it working:
By now, you too should have the capability to sleep/resume your PC from anywhere, even your bed, so no more worries if the computer was left on or not. Just reach to your phone and turn it off.
Well, this was a long one, so happy automations and see you on the next one.